
1. Introduction
Google Ads has evolved much over the years – from being something that was very manual with a lot of control to something that relies much on machine learning and automation.
While Google is trying to make “easier”, I can say that things have gotten more complicated.
New features are constantly added and an inexperienced marketer can easily become tempted to follow the “recommended” options and end up with a disastrous setup that will drain your money faster than you can imagine.
Google will in many cases try to make you choose the options that give you the broadest targeting, the least control and as much automation as possible.
For most B2Bs with low volume on hard leads, Google’s automated smart bidding strategies fail.
My general advice is to stay away from the recommended options.
With that said, I will do my best to guide you through the jungle of preferences to make sure that your account is not wasting any unnecessary money.
2. Creating Campaigns
2.1 Account Hierarchy
Just to give you a mental picture of what is going on and what we will talk about in this chapter I show where the structure of a Google Ads Account.
One account can have multiple Campaigns, and each Campaign can have multiple Ad Groups. An Ad Group is what it sounds like; a group of ads related to a group of keywords.

2.2 Create the campaign
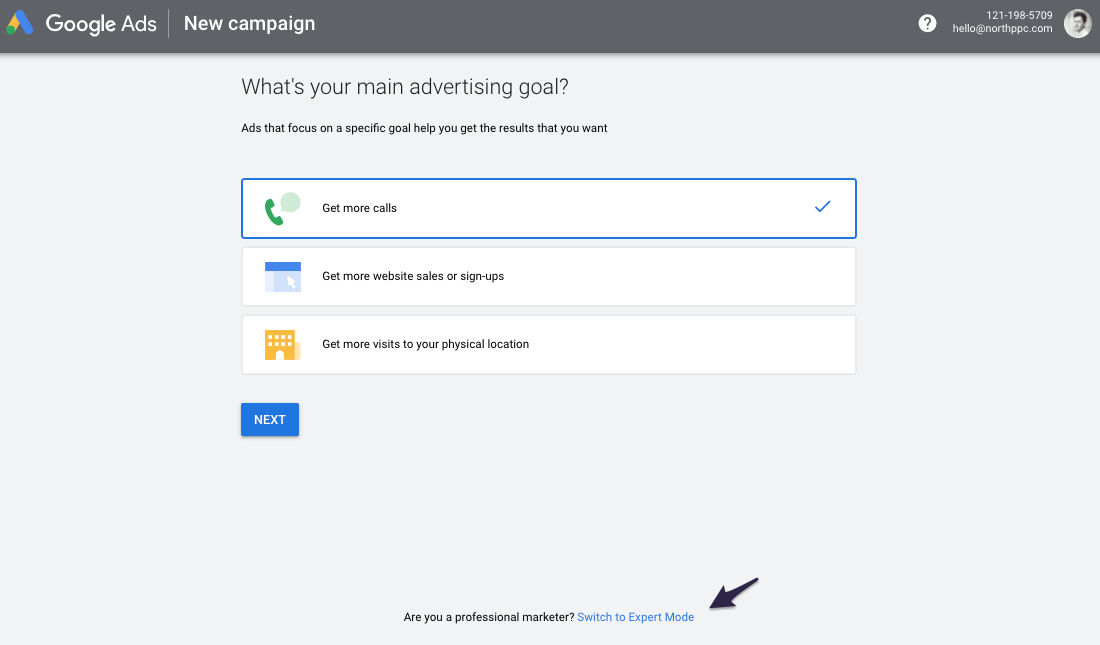
Within the first clicks when creating a new account Google will try to take away your control by guiding you into something called Smart Campaigns – no, just no. If you go into Smart Campaign-mode, you cannot go back to “Expert” mode without creating a new account.
What you need to do is to click “Switch to Expert Mode”. Don't worry, you don't need to be an expert.
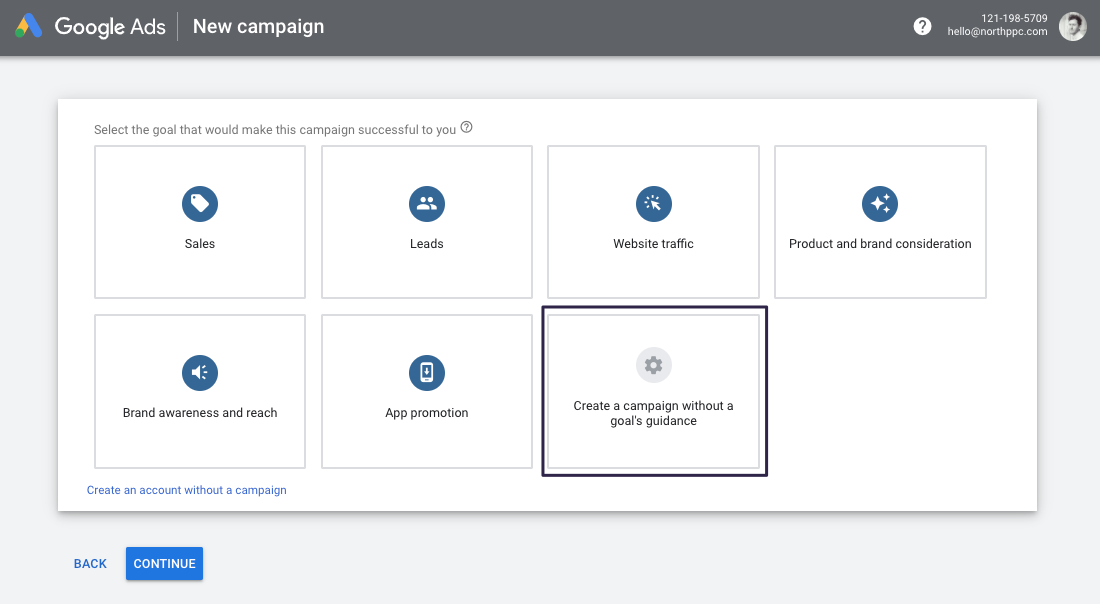
In the next step you should once again fall into Google’s trap of choosing their pre-defined goals, it will mess up your bidding strategies.
Go for the “Create a campaign without a goal’s guidance”.
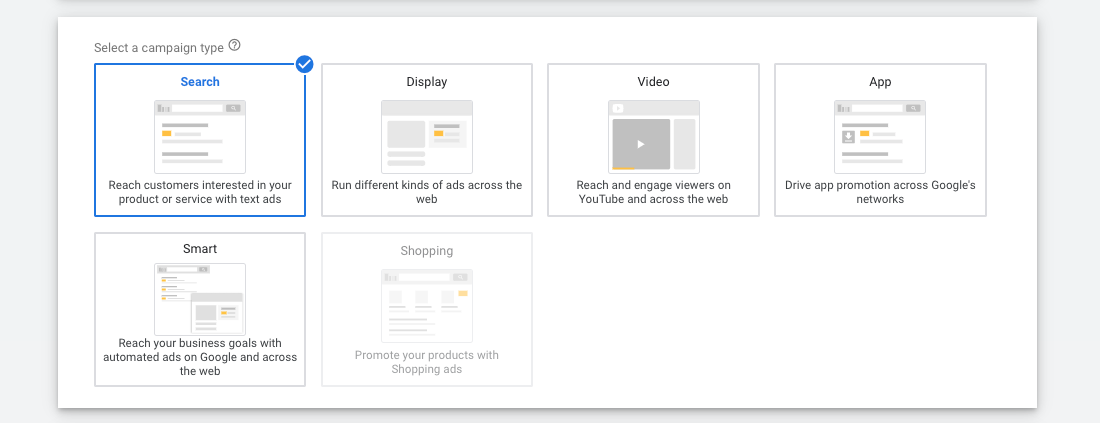
Select “Search” – you can always enable those other types later if you want. Search gives you the default setup that will be the baseline for this guide.
Check the checkbox for “Website visits” and enter your website URL. You can always enable Phone calls and App downloads later.
Press “Continue” to continue setting up the first campaign.

2.3 Campaign name
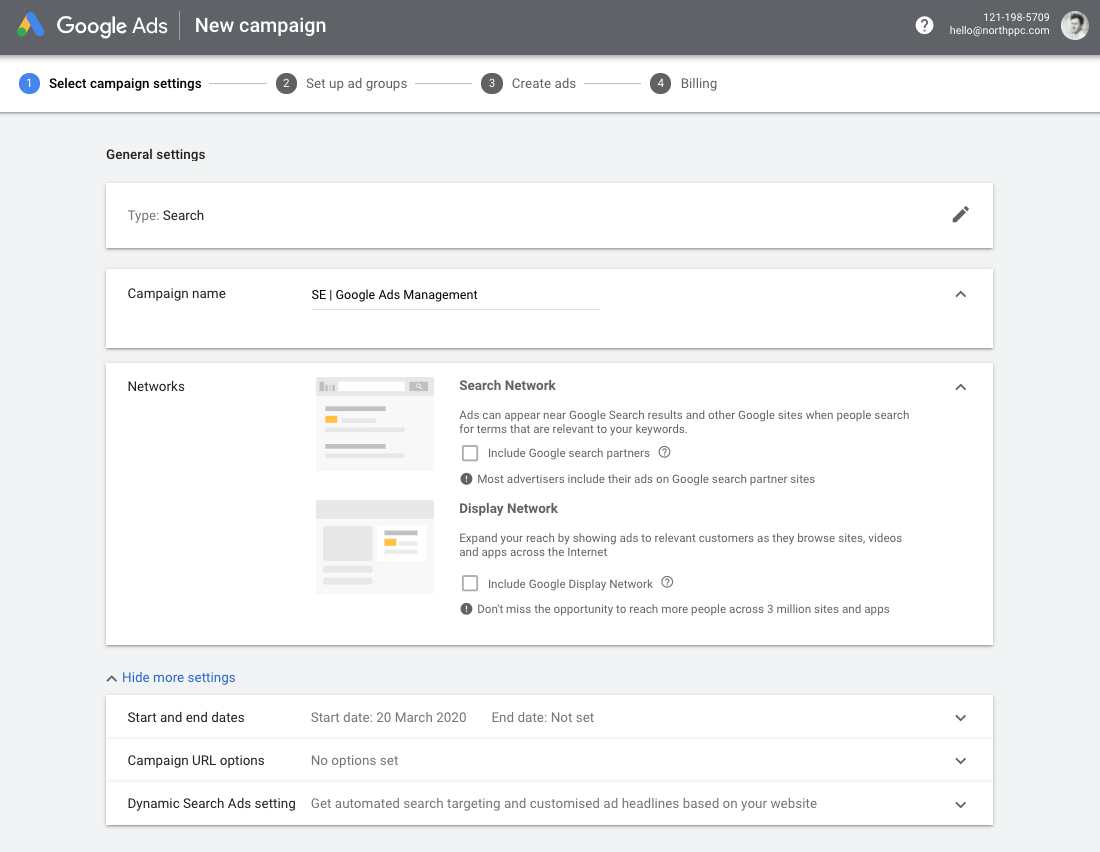
Under Campaign name I usually specify which Country and Language (since it is on campaign level you specify location for your ads) if needed then followed by a pipe “|” and the campaign name.
Generally you want to segment your campaigns based on your service offerings, take a look at your website’s main navigation to get an idea on how to split up campaigns.
2.4 Networks
Uncheck both “Search Network” and “Display Network” for now – this is a campaign where we want to deliver search ads to Google searches, nothing else. You don’t want your ads to show up on Amazon.com’s search result page do you?
Leave the “More settings” as they are per default.
3. Targeting and Audiences
3.1 Locations
Now it is starting to become a bit more interesting - where and to whom to advertise.
In this first Location option we want to select “Enter another location” then press “Advanced search”.

Google Ads - Campaign Locations settings
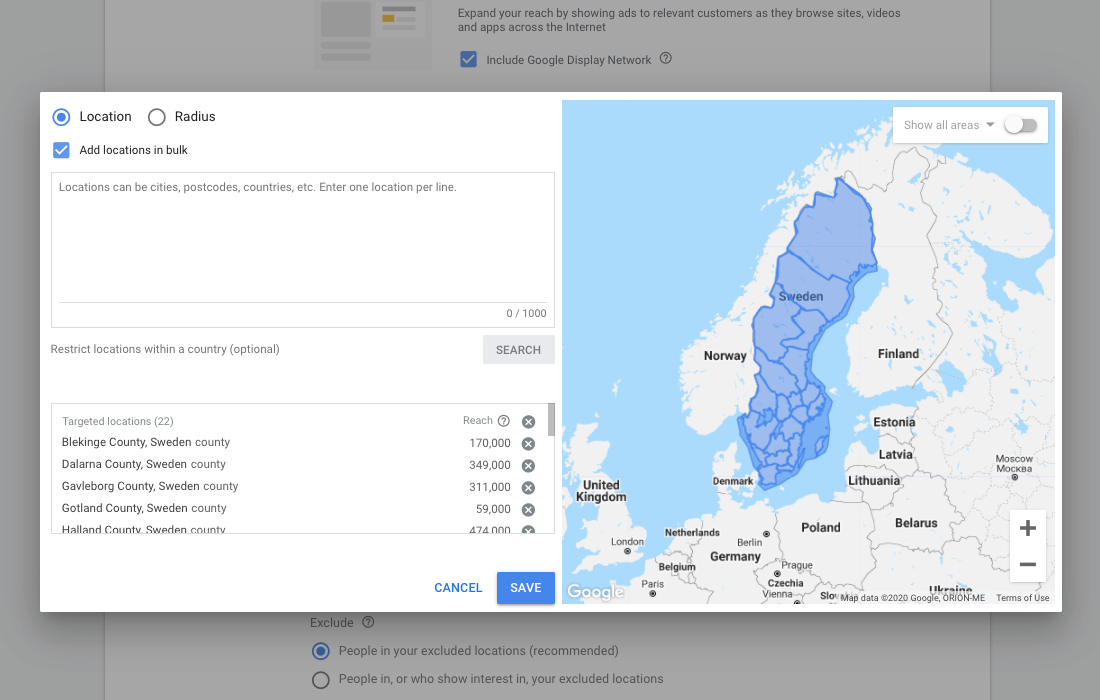
That will bring up another screen where you can specify locations in your locations, in this example I am going to advertise to people in Sweden. BUT - we want to refine our locations by segmenting the country into smaller segments.
Tip! In this case I have looked up a list of all the counties in Sweden on Wikipedia (it’s 21) and put them into my Notes application for future use.
What you do next is to copy paste the list you have from your country into the “Add locations in bulk” textarea input. Then target all the counties, make sure that you have covered your entire location in the graphics to the right.
What you should do next is to add the whole country, in this case I just search for Sweden and press “target”.
The reason behind this granular segmentation of location is that it gives you complete control over what areas you are advertising in. You can turn off some segments or increase/decrease bids in areas that need it.
(Bid adjustments on smaller segments are also available in the “Location -> Geographic Report” setting even if you don’t segment your country in counties when creating the campaign. But only after there have been impressions of your ads in that specific region which takes away some of the control we want).
3.2 Target / Exclude
The “recommended” and default option here is to show ads to people who show interest in your targeted locations. This could mean that you spend money on clicks on people in other countries – in some cases you want this and in some cases you don’t, it basically depends on your business type.
If you sell products or services internationally you would set up a campaign per country anyway in order to segment the data correctly. But in some rare cases you may want people in a neighbouring country to see your ads if they live close enough to the country border and you have a physical location.
“People searching for your targeted location” is used when you have a tourist attraction in another state or country that people will search for while they are in another location than the targeted.
My recommendation in most cases is to select “People in or regularly in your targeted locations”.
Under Exclude you can select the recommended option, it only means that you will exclude people that were not targeted.

4. Budget and bidding
4.1 Budget
In the “Budget and bidding” section we will specify what our daily budget is going to be and what bidding strategy we'll use.
I usually recommend starting with a budget that gives all your keywords a fair chance to generate impressions and clicks.
A daily budget of 30 USD spread out on 10 keywords with a CPC of 3 USD each is a good example. Adding too many keywords with a low budget will make many of the keywords never get any impressions.
Your daily budget is determined on how many keywords you have in the campaign and what the estimated CPC (Cost Per Click) those keywords have.
I usually recommend starting with a budget that gives all your keywords a fair chance to generate impressions and clicks. A daily budget of 10 USD spread out on 100 keywords (with a CPC of 1 USD) leaves you in a situation where you are no longer in control.
The key takeaway is that it is better to have more budget spread on fewer keywords than the opposite when starting out.

4.2 Bidding
Bidding is a topic that is quite comprehensive, but I will try my best to break down the key aspects of this very important part of Google Ads.
The first view you are presented with looks like this, with “Clicks” set as the default bidding strategy (what this means is actually the bid strategy called “Maximise Clicks”, which they also state further down).
At a glance this bid strategy might seem like a smart move to drive as many clicks as possible with the lowest cost possible to your website since that would increase that chance of someone “converting” or buying something.
However, if your business is focused on B2B lead generation and sales — then “Maximize Clicks” is not what you want to use. You will lose vital control over your account and most likely waste money.

“Maximise Clicks” is part of Google Ads’ suite of automated bid strategies, others are “Target CPA”, “Target ROAS”, “Maximize conversions”, “Maximise conversion Value”, “Target Impression share”.
When you don’t have enough data for Google to make good decisions it will do it’s best based on what it knows, which is not much when you are just starting out.
Google doesn’t magically know your audience’s paint points or how they think and act in business decisions related to your services or product.
You know that best at this point. When you have hundreds of visitors each day from ads and loads of conversions (around 50+ per campaign / month) we might want to A/B-test an automated bid strategy against a manual one to see if it performs better.
So, to what you actually should select here – click on “Or, select a bid strategy directly (not recommended)”.
After that you are presented with this view, here you select “Manual CPC”.
There is an option to enable “Enhanced CPC” here as well (they never give up). In the past “Enhanced CPC” could result in a maximum bid increase of 30%. So if your max bid was 1 USD for a keyword it could go up to 1.3 USD at most. However, that limit was lifted in 2017 so that Google Ads can theoretically go as high as it wants with a keyword bid if it believes it will result in a conversion.
Enhanced Manual CPC used to be my go to compromise between manually setting the Max CPC bid and at the same time taking advantage of Google’s algorithm to increase the bid with 30% if it resulted in a conversion. It seemed smart.
Nowadays, I am very reluctant to use eCPC unless I can from a statistically significant A/B-test confirm that Google knows enough to make that decision for me.
So for now, we leave the “Enhanced CPC” option unchecked.
5. Campaign Ad settings
Under “Show more settings” we have Conversion tracking, Ad schedule and Ad rotation.
You can just leave the first two as they are for now.
For Ad rotation, start with “rotate evenly” to learn which messaging works. Potentially change to optimize later on.

Ad extensions
Ad extensions are wonderful features that show up together with your ads, and we should look closer at these later – for now we leave them as they are and click “Save and Continue”.
That concludes the setup of a Campaign, and we will now move on to Ad Groups.

6. Ad Groups
There are many opinions on how to set up and structure Ad Groups and their Keywords. But as with everything in life, there is no one solution that fits all – it depends on the circumstances of your business and industry.
But there are some key aspects that I recommend that you follow in order to get as much control over your account but at the same time set up an account that can scale easily when you want.
6.1 Themes
The easiest way to structure your campaigns and ad groups are by Themes. Most commonly you can look at your website’s main navigation.
Maybe you have something like “Services” -> “Service 1”, “Service 2” and “Service 3” in a drop-down menu. Then “Services” would be a good Campaign name and “Service 1, 2 & 3” the three ad groups within that campaign.
Anything like categories, locations, brands, colors, types could be the structure of a campaign and it’s ad groups.
After a while when you have been running your campaign, maybe within 6 months to 12 months, you can begin to see some patterns – what ad groups and keywords perform better than others. When this happens you can start to optimize your campaigns more.
6.2 Advanced strategies
The most common ways to restructure campaigns after they have gotten sufficient data are the following.
Match Types - group same match types together in ad groups to get more control over bidding.
Top Performers – collect great keywords together in an Alpha campaign, and bid more aggressively on those. But keep the traffic generating keywords in a Beta campaign to generate Alpha candidates.
Funnel – structure campaigns based on the keywords position in the buyer journey funnel.
- Top of the Funnel – CPC bid basis and PM keywords.
- Middle of the Funnel – CPC bid basis and PM keywords.
- Bottom of the Funnel – CPA bid basis and Exact match keywords.
SKAGs – (Single Keyword Ad Groups), where you have one Keyword per Ad Group.
The goal of SKAGs is to break down your keyword:search term ratio to get as close to a 1:1 correlation as possible, resulting in an increased Quality Score and overall lowered Cost-Per-Click (CPC).
Keyword tapering - Leverage mining campaigns to extract golden nugget search terms and transfer them over to your exact match only campaigns.
7. Ads settings
7.1 Number of ads
When first setting up your ad groups you also need to create ads. I usually went with the recommended 3 ads per ad group when I know it is generating enough impressions.
But now when the Responsive Search Ads (RSA) is becoming the new standard (June 2022) I stick with one RSA and the best performing Expanded Text Ad (ETA).
If you don’t have any extended text ads, just create one RSA for each ad group, but make sure to populate it with a good copy for all headlines and descriptions.
7.2 Ad rotation
Start with rotating evenly to learn which messaging works. Potentially change to optimize later on.
7.3 Ad Scheduling
Set up daily and hourly segments. Monday to Sunday, and six chunks of 4 hours per day (8-12, 12-16, 16-20, 20-24, 24-04, 04-08). Bid less per click during the night (-60/70%).
7.4 Device type
Where are your customers typically when they are searching for your products or services? If you CAN spend your budget on Desktop alone, then do it because of generally higher CR and lower CPC.
Don’t bid on tablets initially (-100% bid adjustment).
7.5 Ad extensions
Make as much use of extensions as you can. It will potentially give you more SERP real estate, offer the user more options and increase Quality Scores.

